Did you know that Dave has made some helpful videos on About.com teaching people how to build things? Check out this video on how to Build Utility Cabinets!
http://woodworking.about.com/video/How-to-Build-Utility-Cabinets.htm
And if you’re just looking for the instructions step by step, read below!
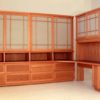
How to Build Utility Cabinets
Hi, I’m Dave Zawistowski from Duet Fine Woodwork. Today for About.com, I’m going to show you how to build utility cabinets.
Necessary Tools
To complete this project, you’re going to need:
- A Rubber Mallet
- Tape Measure
- Pencil
- Safety Glasses
- A Drill with a Screwdriver Bit
- 20 – 2″ screws
- 9 – 1 1/4″ screws.
To cut the sides and the shelves you’ll need:
- Table Saw
- A Router
- A 3/4″ quarter inch dado bit.
To make the dados you’re going to need:
- 2 clamps
- A straight edge
- A sanding block.
Space Your Dados
The sides are seventy-two inches tall, fifteen inches deep and are made out of three quarter-inch plywood.
Starting from the top we’re going to space our dados at sixteen inch intervals. This will give you enough space at the bottom to keep whatever you’re storing off of the floor. The rabid on the back side is done on a table saw with a dado blade. Cut your shelves to sixteen inches wide and fourteen and a half inches deep.
Creating the Dados
To cut a dado for the shelves, I’m going to use a straight edge. Place your straight edge right on those marks and clamp. Before you start using any equipment you always want to put your safety glasses on. To router a dado you want to hold your router tight against the fence and move across the board slowly. Sanding block will take care of most of the frayed edges. And that’s how you make your dado for your shelves.
Reinforce With Screws
Make sure they’re flush in the front and flush in the back. Take the opposite side, bring it on top. Start from one end. The dado is the strength to this cabinet. Screws give it a nice positive connection. If you ever decide you want wider shelves you just unscrew it and put in wider shelves.
The Back of the Cabinet
Done with one side, let’s flip it over. Make sure everything is flush. Once you have the two sides connected flip it onto it’s face and put a back on. I’m using two pieces here, you can use one piece. The back is what gives a cabinet it’s strength. Screw the back on. With the back on, we are finished. I designed it to hold paint cans. You can get four one each shelf.